EMAIL ME
HOME
FRAMED MEDALS
ASSOCIATION MEDALS
MILITARY MEDALS
CLOCKS
EMAIL ME
HOME
FRAMED MEDALS
ASSOCIATION MEDALS
MILITARY MEDALS
CLOCKS
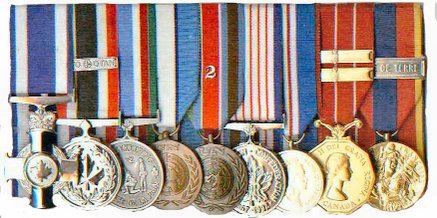
 Medals of a 2nd WW Veteran

WHAT YOU NEED
 1. RIBBON BACKING: It will be 2 inches long, the width of the ribbon, and about the thickness of stiff cardboard.
 2. MOUNTING BOARD: Thick backing preferable plastic that you could put nails through and use as pins. Backing should be 3 ¾ inches top to bottom 5 or less are mounted side by side, 6 or more are overlapped. Start with the junior medal and work right to left as you are looking at the board. Set the last ribbon in place mark it and cut to size add the border (Trim) and put your last ribbon on.
 3. BACKING MATERIAL: Cut some material for the back of the mounting board. Make it larger than your board (No.2) and trim it down to size later. Colour of your choice felt material is the best material to work with.
  4. SIDE PIECES: Use some left over ribbon that match up to the ribbon that you are using for covering the end of your mounting board.
 5. RIBBON: Ribbon should be 4 inches long and of course the right colours for your medals.
6. GLUE: Your favorite hobby craft glue and tools of the trade your glue, silicone for gluing the medals down to hold in place, nails for the backboard, clutch pins for the nails two types.
 More tools of the trade a hammer for putting the nails 5/8 to 3/4 inch and thick enough to fit into clutch pins approximately 1/32 of an inch through the plastic backing , a bag of pre cut backing for normal size ribbon 2 inches long about 1/32 inch in thickness and the approximate width of the ribbon, plastic backing covering with two strips of 2 inch masking tape to hold the glue once applied, scissors to cut the ribbon and excess backing once ribbons are applied, pencil to ensure measurements are correct 4 inches top to bottom and of course the ruler to make sure you have it right. Hopefully these instructions are clear enough to follow a simple lesson plan.
 7. MEDALS: And finally you need the medals that you are planning on mounting. They need to be cleaned polished and sealed. 4 inches is used to mount the medals as per sample above.
 GETTING STARTED
Take your mounting board, cut 3 3/4 inches in length and width of ribbon. Use additional material to cut for end of board or use additional ribbon and cut down the middle. (Above left). If using appropriate size nails at least ¾ inches nail through ribbon and backboard before putting on the finished medal. Use nails sized to clutch pins being used.
 Putting ribbon on back board overlap at bottom

Reverse side of medal with backing for stiffness's
 Completed medals
Using 2 medals as an example glue one end piece on to your backing and then put one ribbon in place mounting from right to left on Military Medals. Association medals mount the reverse, left to right, less senior medal first. Lay next ribbon in place, line up with edge of backboard and trace the width. Cut to size and glue end piece in place as seen above left. Glue ribbon to mounting board.(Above right). Add pins if not using the broach
Then do the same to the for the medal boards. (back of medals shown in picture - above left) Notice the backboard is completed with ribbon and end piece backing is glued in place at the reverse side of the medals. Using your white glue or two way tape, whichever you prefer, place medal onto backboard. Then use backing material to finish of the back. To clean ribbons after mounting use a clean cloth and water and rub off excess glue. You now have medals ready for wear with pride on any parade.
 Sample of 5 or less, pins or bar on the back to fasten to left breast pocket
 5 or more medals overlapped, pins or broach used on the back
 A sample of Minni's full size and ribbons to match
 Miniature medals are not overlapped. They are 2 inches top to bottom, same procedure as full size for mounting. No many people wear this many medals These belong to (Ret Col Ron Werry
For those that wish to purchase ribbon medals or kit stores may go to http://www.thercrkitshop.com/ Also Joe Drouin at: http://www.joedrouin.com/

Wayne Cline -The boss man at Marway and his protector
Also see Jamie the Bosses helper at: http://www.marway-militaria.com/
FRAMED MEDALS ASSOCIATION MEDALS
1 comment:
I am so glad to see this post.
Endowment
Medallions
Post a Comment